Tuesday, June 04, 2019

Mice & Mystics / Boxes of Fury review

My daughters gave me Mice and Mystics as a christmas gift, and we managed to play a couple of games in March this year. The girls really like it, so I went in typical wargames hoarder overdrive and managed to buy all extensions to the game (Heart of Glorm, which is in effect OOP, but I managed to find a copy in an obscure gameshop in the Netherlands; Downwood Tales, which was almost OOP, but I managed to find a copy at a gameshop here in Sweden that tend to have good stuff) and the follow-up Tail Feathers.

Gerelateerde afbeelding
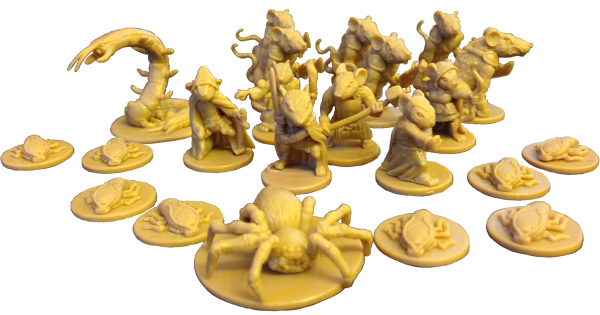
Mice and Mystics, original figures (so you can compare with the Boxes of Fury ones)


Going through the rules and scenarios (for an extensive review, check boardgamesgeek, I notices that for some special characters or variants on creatures, they advice to use the normal creatures that are included in the game, with a token. Now obviously that won't do (after all, I am a hoarder and buy variants of the same tank to use as supports in Chain of Command...). So off I went on another frenzy looking online, and at 3D print providers for alternate characters. Most of the stuff I managed to find at Reaper minis, and some stuff was printed by a friend of mine (Jocke, front and center). And I also found Boxes of Fury.

Boxes of Fury is a (very) small operation in Russia, that have some special characters for Mice and Mystics, that are hard to find alternatives for. They looked nice and the prices were reasonable, so I ordered a couple of them. After a lot of shenanigans with the Swedish Post (who handle import and VAT for Swedish Customs), who managed to send back a package (upon which Andrey, the guy behind Boxes of Fury, immediately resent my order even before he had got back the original one (and free of cost!)), and then took 3 weeks to propery customs handle the new package... But today I got them, and they were well worth the wait.

Every figure/set comes in a nice little container that I can think of many ways to reuse ;-)

I ordered Captain Vurst (the baddie from the original game), King Shalop (the king baddie from Downwood Tales), as well as some pets that can support the good characters in the game (slugs, a ladybug and an ant-lion). I also found the Cheese Golem in the box (Thank you, Andrey!!!). 

Captain Vurst - even at extreme magnification (this figure is 2,5cm high), you can see the clean sculpt and casting
King Shalop

All figures are neatly cast in resin. They are lovely figures, nicely and realistically sculpted and well fitting in style with the figures that come with the games. The resin is neat and free of flash. For some figures minor assembly is required, and bases as well as a piece of copper plated steel rod for the flying ladybird are included. I really like the figures, and I can really recommend them. I can also really recommend Boxes of Fury as an operation - Andrey was very quick and helpful (as mentioned above when resending the package).

Bases (here add-on bases for the pets) are included for all figures.
Here you can also see the piece of steel rod for the ladybug.

The Cheese Golem
All the pets, with bases for the ant-lion and the ladybug (and as mentioned a piece of copper plated steel rod for the latter, if you want to make it fly)
I hope to get these on the painting table, together with all the figures from the original set and first extension next week (this week I'm painting Star Wars: Legion figures, for a game on Friday, using Crooked Dice 7TV rules - more on that later, hopefully)

Friday, September 21, 2018

Rebel Rebel

Been pretty quiet for a while, but lately have picked up the pace a bit. Here's some pictures of the stuff I am working on now - figures for Star Wars: Legion

Nearly finished Rebel squad

Rebel scouts and walkers, Imperial speeders, prepped and primed

Stormtroopers and speeder crews prepped and primed

Saturday, February 17, 2018

WOW buildings review - part 2

Two weeks ago I posted a review after we felt cheated by Paul at WoW buildings (see here). As I mentioned in an update on that blogpost, Paul then contacted us and offered to reprint (these are 3D prints) and resend. We agreed to that, and I promised to post a new review.

Paul promised to send immediately after the weekend, in the end he sent it on the Friday after (fair enough, things can happen, so no bad feelings about that). Yesterday Thomas got a slip for the post office and today he picked up the box. 

I'm not going to comment much, I'm posting a load of pictures underneath, you can check for yourselves. Just this - yes, the quality has improved, but no, these are not finished products. I had contact with Paul on this, and he says he's still improving the product, and should have it settled by now. What beats me though, is how you can willingly and knowingly send out products that you can clearly see do not have the right quality. Or how you send out products that are still in design phase to get customer feedback - without telling your customer...

In the meantime we'd also opened a Paypal case, and Paypal judged in our favour and refunded. We did this as the original order dated back of September, and we'd been promised the products several times without receiving them, so we didn't want to wait with the Paypal case, in order not to run out of time. Note that we'd promised Paul that we would pay him in case Paypal refunded before we got the new houses, and we were happy with them. He agreed to that. Now Paul feels that the matter is closed since we'd had a refund. 

This is all a pity, as the design and the renders looked good, and we were really looking forward to adding these to our tables for Dutch games...

Below are a number of pictures Thomas made...


Saturday, February 03, 2018

WoW buildings review

Note: update below

One thing as a starter... The company may be called WOW, but the products are definitely NOT WOW.

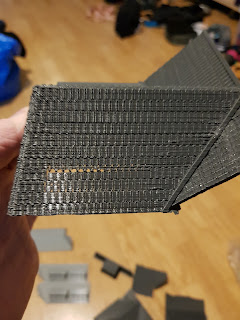
We placed an order with WoW in September, planning to use the buildings at a con in December. After a lot of back and forth emails, we finally got our stuff yesterday (1 February). However, we were quite disappointed with the delivery (understatement). The packaging was crap: all the printed wall and roof pieces were just put loose in the box, not packed by building, no documentation, and with just 2 inflatable plastic packing bags as protection. Due to everything being loose, some sharp edges had perforated the bags during transport, so they didn't offer any protection anymore. This caused some of the pieces to be cracked.

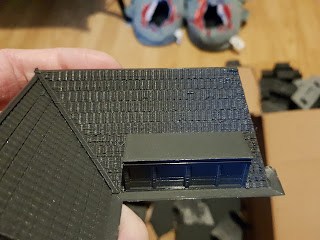
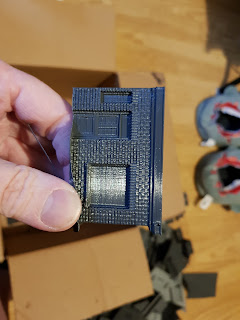
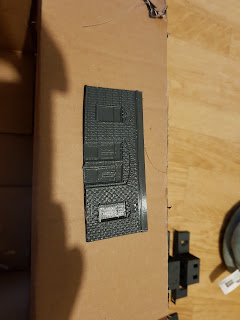
Sadly the quality of the contents was beyond belief. Apart from damage caused by the crap packaging, most of the pieces are either warped or stringy, doors and shutters are only partly printed, corners and sides have come loose from the printer's ground plate during the printing process, causing warping, sides have come loose from flat pieces, dirt from the extruder has come out causing lumps on walls and roofs, some roofs are just long loose ends of string - in their entirety! All of this is obviously a result of (very) bad 3d printing (wrong temperature, no attention during the start of the process, etc...). It is also very visible and there is no way the seller did not notice this while packing. Which means he deliberately sent us products of bad quality, or couldn't care less that he was sending us crap. Not sure which is worse.

Obviously, from other comments on facebook, he must have good products, which makes is only worse that what we got is this bad. We were really looking forward to adding these buildings for Arnhem and other Dutch games, so we are extremely disappointed.

Equally obviously we opened a paypal dispute, and contacted the seller for a full refund. Waiting for his feedback now.

WOW buildings are trading from this website and from a facebook page.

Update: Paul has reached out to us in the meantime and offered to reprint and resend on Monday. We can also keep what we received to do with as we please (e.g. make ruins). I will update this blogpost with any news that comes out, and we will do a new review if and when we get the new delivery. He also mentions the light grey bits were bad prints that he added for us to use as ruins or whatever.

Update 2: see a new blogpost on this matter here


Monday, June 05, 2017

Wattle fencing and Renedra ruins

I got these ages ago, maybe two years or so, from Annie  @ Bad Squiddo Games (altough she no longer carries them...).

Steps for the wattle fencing:

  • Based on 2cm wide cardboard, clipped the corner in 45 degrees so I can make corners (Thanks Leif!)
  • Primed black, incl. the base with Vallejo black primer
  • Wetbrushed with a mix of Vallejo Chocolate Brown and Dark Seagreen, including the bases
  • Drybrush with a mix of Tan Earth and Dark Seagree
  • Added Stone grey to lighten and drybrushed again
  • Washed with a 50/50 mix of Futur Pledge and Army Painted Dark Tone (you can also use Nuln Oil) to add more contrast
  • Repeated the step before the wash.
  • Added Off-White to lighten even more and drybrushed sparingly
  • A minimal drybrush with Off-white with a touch of Stone Grey
  • Vallejo Sand texture on some spots to add texture and wall filler near the gates, to make a rougher texture. Painted Chocolate Brown, then drybrushed with Tan Earth, then Iraqi Sand.
  • Added spring blossom tufts (Mininatur), some Gamers Grass tufts in 2 shades of green. Some flock on the wattle to represent moss or weeds. Added some green lichen to represent bushes taking hold.
I forgot to take pictures on the way... The first one is after the painting, and when I'd added the texture to the ground. The rest is when completed.


The ruins are type A, B and D if I remember correctly. The sprues also contain some additional scatter terrain.

Steps:
  • Primed black with Vallejo black primer
  • Wetbrush with Dark Seagreen and a touch of black
  • Drybrush w Dark Seagree
  • Wash of 50/50 mix of Future Pledge and AP Dark Tone
  • Drybrush with Dark Seagreen again
  • Adding Off-white in 2 stages and drybrushed lighter
  • Pinwashing with AP Strong Tone in the joints and adding vertical streaks
  • Painted the base Chocolate brown, then drybrushed with Tan Earth, then Iraqi Sand.
  • Same basing steps as for the wattle fences plus some weeds in the joints and some moss in darker places.
  • Scatter terrain is based on 25 or 30mm mdf bases and textured with wall filler, then the same steps to drybrush and add weeds and grass.