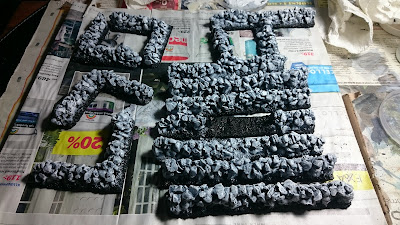
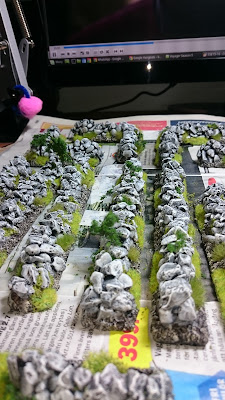
I missed some pictures along the way, but those steps are easy to imagine...
I started by washing them in the sink with detergent.
As the walls have inbuilt bases that I figured big enough for my purpose, I decided not to base them.
Next step - spraying black with a cheap primer (from Biltema for my fellow Swedes)
After drying outside over night, I checked the priming and did some extra touches on missed spots with Vallejo paint-on black primer. At this stage I noticed that there are some real deep holes in the walls - it seems that the masters were built by glueing together some stones and a mould made of that. Not a problem for me (I want these for Dark Ages and Dux Gondorum), but could be that they're less relevant in a more "ordered" environment. This was also something that my friend Laffe commented on.
Next step: drybrushing the walls in shades of grey (definitely not 50!!). I used a white acrylic craft paint for this, mixed with some Vallejo black primer (as I'd run out of black craft paint and I have literally half a liter of primer).


After that I painted the ground dark brown with an acrylic paint for the same range, and then drybrushed that, by adding more and more sand colour to the brown. Again, I used three layers.

After drying, I mixed up a wash consisting of 50% Futur Pledge (product to clean/treat stone floors, which acts as a protective layer as well as good basis for a wash. It is slightly shiny, so requires a matt varnish afterwards), 40% Army Painter Dark Tone ink and 10% Strong tone (to give it a more earthy appearance). I generously slathered the walls and the ground with this, this brings them "together" I feel. I missed taking a picture after this.
Next came a final drybrush - Vallejo model Off-White on the walls and Pale Sand on the ground. No picture here either, I was cracking on at this stage.
I then started to add flock and grass. I didn't take pictures after each step though, but here's what I did:
- First I added some Gamers Grass spring tufts to the ground, some smaller regular ones and medium irregular ones, both 4mm. At the same time I put on some spring flowers (white and yellow), I think from Mininatur, that I got off Bad Squiddo Annie, although she no longer seems to carry them).
- Then I added some Army Painter small green tufts in some of the cracks in the walls, to represent weeds popping up in an untended stone wall.
- Next was some fine Ziterdes light green flock, added to some other recesses in the walls, to represent moss and other weeds.
- Next came some light green static grass (I think from Ziterdes as well) to ground next to the walls (in some places only to create an irregular effect)
- Finally I added some Woodland Scenics fine-leaf foliage branches to the deeper recesses in the walls (the ones I commented on earlier, they came in handy for this step, or better, seeing them gave me the idea to do this), to represent some brushes and smaller trees growing out of these walls. I reinforces the untended appearance.
This give this endresult (before applying a matt varnish spray.
In the end I spent quite some time painting and basing these, but I'm very happy with the end result. From a modest investment of £16 and a couple of hours of work, this is a nice result.
Note that there is one piece that I have not painted, another "entryway", similar to the piece front left. I'm not sure I'm going to use that as is, or convert that into another piece of broken down wall (there is one piece of broken down wall - the middle one of the 5 long straight ones.


2 comments:
Well, job's a good one!
Nice work!
Cheers guys ;)
Post a Comment