Monday, June 05, 2017

Wattle fencing and Renedra ruins

I got these ages ago, maybe two years or so, from Annie  @ Bad Squiddo Games (altough she no longer carries them...).

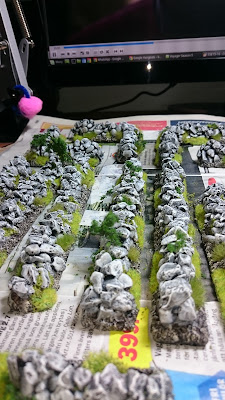
Steps for the wattle fencing:

  • Based on 2cm wide cardboard, clipped the corner in 45 degrees so I can make corners (Thanks Leif!)
  • Primed black, incl. the base with Vallejo black primer
  • Wetbrushed with a mix of Vallejo Chocolate Brown and Dark Seagreen, including the bases
  • Drybrush with a mix of Tan Earth and Dark Seagree
  • Added Stone grey to lighten and drybrushed again
  • Washed with a 50/50 mix of Futur Pledge and Army Painted Dark Tone (you can also use Nuln Oil) to add more contrast
  • Repeated the step before the wash.
  • Added Off-White to lighten even more and drybrushed sparingly
  • A minimal drybrush with Off-white with a touch of Stone Grey
  • Vallejo Sand texture on some spots to add texture and wall filler near the gates, to make a rougher texture. Painted Chocolate Brown, then drybrushed with Tan Earth, then Iraqi Sand.
  • Added spring blossom tufts (Mininatur), some Gamers Grass tufts in 2 shades of green. Some flock on the wattle to represent moss or weeds. Added some green lichen to represent bushes taking hold.
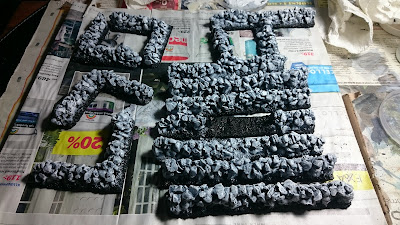
I forgot to take pictures on the way... The first one is after the painting, and when I'd added the texture to the ground. The rest is when completed.


The ruins are type A, B and D if I remember correctly. The sprues also contain some additional scatter terrain.

Steps:
  • Primed black with Vallejo black primer
  • Wetbrush with Dark Seagreen and a touch of black
  • Drybrush w Dark Seagree
  • Wash of 50/50 mix of Future Pledge and AP Dark Tone
  • Drybrush with Dark Seagreen again
  • Adding Off-white in 2 stages and drybrushed lighter
  • Pinwashing with AP Strong Tone in the joints and adding vertical streaks
  • Painted the base Chocolate brown, then drybrushed with Tan Earth, then Iraqi Sand.
  • Same basing steps as for the wattle fences plus some weeds in the joints and some moss in darker places.
  • Scatter terrain is based on 25 or 30mm mdf bases and textured with wall filler, then the same steps to drybrush and add weeds and grass.


Wednesday, May 31, 2017

Annie's second Kickstarter

I don't often link to commercial items, but I tend to make an exception for Annie, of Bad Squiddo Games fame... She's just put on her second kickstarter, the sequel to her earlier Ghosts of Gaia. This one is Ghosts of Gaia II, and contains 13 (for starters) additional female SF/Post-Apoc figures by the same sculptor. And promises loads of interesting add-ons and stretch goals, like Bunnies with Bombs! (not that kind of bunnies!!!!).

Without further ado, go here and support Annie!

foto van The Dice Bag Lady - Bad Squiddo Games.

Friday, May 26, 2017

Painting and basing my Red Dragon Gaming walls

Follow up on the article on the Red Dragon Gaming walls I got.

I missed some pictures along the way, but those steps are easy to imagine...


I started by washing them in the sink with detergent.

As the walls have inbuilt bases that I figured big enough for my purpose, I decided not to base them.

Next step - spraying black with a cheap primer (from Biltema for my fellow Swedes)

After drying outside over night, I checked the priming and did some extra touches on missed spots with Vallejo paint-on black primer. At this stage I noticed that there are some real deep holes in the walls - it seems that the masters were built by glueing together some stones and a mould made of that. Not a problem for me (I want these for Dark Ages and Dux Gondorum), but could be that they're less relevant in a more "ordered" environment. This was also something that my friend Laffe commented on.

Next step: drybrushing the walls in shades of grey (definitely not 50!!). I used a white acrylic craft paint for this, mixed with some Vallejo black primer (as I'd run out of black craft paint and I have literally half a liter of primer).

I did three drybrushing layers, adding more and more white for each layer.

After that I painted the ground dark brown with an acrylic paint for the same range, and then drybrushed that, by adding more and more sand colour to the brown. Again, I used three layers.

After drying, I mixed up a wash consisting of 50% Futur Pledge (product to clean/treat stone floors, which acts as a protective layer as well as good basis for a wash. It is slightly shiny, so requires a matt varnish afterwards), 40% Army Painter Dark Tone ink and 10% Strong tone (to give it a more earthy appearance). I generously slathered the walls and the ground with this, this brings them "together" I feel. I missed taking a picture after this.

Next came a final drybrush - Vallejo model Off-White on the walls and Pale Sand on the ground. No picture here either, I was cracking on at this stage.

I then started to add flock and grass. I didn't take pictures after each step though, but here's what I did:
  • First I added some Gamers Grass spring tufts to the ground, some smaller regular ones and medium irregular ones, both 4mm. At the same time I put on some spring flowers (white and yellow), I think from Mininatur, that I got off Bad Squiddo Annie, although she no longer seems to carry them).
  • Then I added some Army Painter small green tufts in some of the cracks in the walls, to represent weeds popping up in an untended stone wall.
  • Next was some fine Ziterdes light green flock, added to some other recesses in the walls, to represent moss and other weeds.
  • Next came some light green static grass (I think from Ziterdes as well) to ground next to the walls (in some places only to create an irregular effect)
  • Finally I added some Woodland Scenics fine-leaf foliage branches to the deeper recesses in the walls (the ones I commented on earlier, they came in handy for this step, or better, seeing them gave me the idea to do this), to represent some brushes and smaller trees growing out of these walls. I reinforces the untended appearance.

This give this endresult (before applying a matt varnish spray.


In the end I spent quite some time painting and basing these, but I'm very happy with the end result. From a modest investment of £16 and a couple of hours of work, this is a nice result.

Note that there is one piece that I have not painted, another "entryway", similar to the piece front left. I'm not sure I'm going to use that as is, or convert that into another piece of broken down wall (there is one piece of broken down wall - the middle one of the 5 long straight ones.


Thursday, May 18, 2017

Review of Red Dragon gaming resin scenics

I ran into this (for me) new company through a friend's post in twitter and decided to give them a go. The company's website is http://www.reddragongaming.co.uk. They offer mostly resin scenery and terrain bits, both painted (in various finishes) and unpainted. As I like painting, I looked mainly at the unpainted versions. For our Dark Ages and Dux Gondorum games, we could use some flint walls, so I checked out those. They have various single items and two packs:

  • A standard stone wall set, containing 4 large corners, 3 long walls and 1 wall with entry
  • An extension wall set, containing 2 large T-shaped bits, 1 long broken wall bit, 1 normal long wall bits and a wall with an entry. Most of the wall bits are 15cms (6") long.
Both sets cost £8 unpainted, which I thought was very reasonable. Painted sets are about 50-125% more expensive, which is still reasonable in most cases. You can choose various finishes (wasteland, grassland, desert, with or without flocking.

I also grabbed a bomb crater set while I was there, for £4 (painted is £7,50). The set contains 1 larger and 2 smaller craters.

I got the order today (I ordered 9 days ago, which is decent turnaround time from the UK to Sweden). 

Big jiffy bag with all the goodies
On opening the bag there were 2 smaller packs (each containing a set, the extension set also had the crater set in with it). Both sets were in zip lock bags, and wrapped in more bubble wrap. Everything had survived the trip unscathed. Bonus points for that!

2 bubble wrapped bags containing a set each
 
Each set came in a zip lock bag

The standard wall set

The extension set
Closer details

More closer details
On opening the bags, you get that special resin odour coming out ;-) The resin (off-white, slightly transparent) is crisp, I have seen no signs of worn or bad moulds. Details are fine, no bubbles or damages. Detail is deep, with even some deep recesses between some stones. The walls all come on bases. These have been sanded straight on the bottom and can be used as is (so no need to add extra bases, unless you want to). The bases are detailed and can be painted as they are, there is sufficient patterning to represent rough ground. They should be suitable for 20 to heroic 28 (or 32mm ;-) ) gaming.

I plan to paint these quickly as they shouldn't need too much work. Black priming, grey drybrushing in a couple of layers, paint the bases brown, with some drybrushing, and some flocking. Maybe some washing in between. I'll put up some pictures and report how they paint up.

As a summary - these look like a good buy, at a very decent price, and I'd like to recommend these. 

Friday, May 12, 2017

Scenario sale @ Wargaming Odds and Ends

Have a quick look at http://cstoesen.blogspot.se/2017/05/spring-scenario-sale.html, where Chris Stoesen is having a scenario sale (50% off) on scenario booklets suitable for different Lardie rulesets.

Sunday, April 09, 2017

Wednesday, January 18, 2017

Cold stuff

Another quick update...

In an earlier post I wrote about the Frozen characters I was painting for my daughters. These are done now, and the girls are very happy with them. Here's some pics of the finished sets.


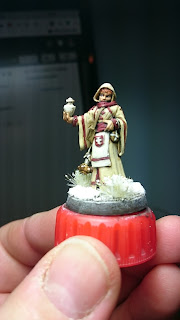
I also finished a single figure for Frostgrave, an apothecary. This is a metal Reaper figure, Olivia, Mercenaries Cleric, that I got from Annie @ Bad Squiddo Games early last year.


See you in Hell, Billy Yank...

Thomas and I decided to start a project for SP2, playing ACW. He'd started painting Confederates a while back, and I'd do Union. So I picked up some heavily discounted boxes of Perry plastics (these are from the new Union Infantry in Sack Coats box) and started painting. Here are my first Union units: 20 infantrymen (2,5 units in SP2), 2 leaders (an officer and a sergeant) and a drummer.


Up next, another dozen infantrymen (I paint by groups of 12, usually), and probably the dozen Union cavalry skirmishers I got in the Secret Santa scheme.


Tuesday, January 17, 2017

Female Soviet Snipers

I got some of these off Annie's Kickstarter a while back, and decided to paint some as a Christmas surprise present for a good friend.


Find the whole range of Bad Squiddo Games, 28mm female soviets.


First secret santa present completed

A quick update to thank the Secret Santa that sent me the Perry British 6pdr w crew for North Africa. I just had to paint it ;-)

Here's some pictures:

All assembled and ready for painting

All done and ready for action